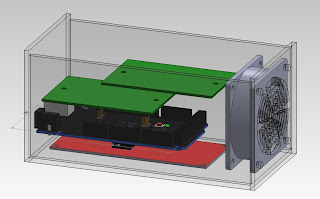
I originally started with a long design that looks something like this:
The Arduino, green perf boards (roughly modeled), and the Geiger Counter breakout board would be laid on top of each other, with the fan on one end :
However, this was a bit unappealing as I realized that I had no good way of easily accessing the Arduino when trying to make changes. The box is about 3"x3"x6", and working within a 3" wide box seemed rather hard. Also, finding a good way of attaching the Arduino to the wall was difficult. The Arduino is wider than the Geiger Counter board, but just barely, making it actually impossible to use standoffs when both boards are stacked lengthwise. Thus, I scrapped this design.
----------------------------------
The new design features a more square box with dimensions of approximately 5" x 5.5" x 3.5". (The design also looks more sound simply because I've managed to render the standoffs.):
If you look closely, you'll notice that inside the box, both boards are placed inside a base. The base will be Velcro-ed to the bottom of the box, which allows you to make changes to the circuitry without having to take apart the whole box.
The box top is another assembly of many things. (Hopefully it should hold its weight.)
All the sensors are put on top of the box (as some sensors, especially the gas sensors, need to be in direct contact with the surroundings).Below the lid, there are two perf boards that house all the other electronics such as your capacitors and resistors. The gas sensors are also placed on an elevated platform so that air blown out from the fan will be able to create some kind of airflow around the sensors. This elevated platform is also removable:
I have rendered it so that there is space for 7 sensors (hopefully - the actual sensor sockets haven't arrived yet so I'm still unsure about those dimensions), but it seems that I am only able to work with 4 sensors now as the order of additional sensors haven't yet arrived. Put together, everything looks like this:
You'll notice that the top sticks out a bit at the edges. I plan fix the lid in place by using L-shaped aluminum bars with screws and nuts attached on the underside of the lid and walls. This makes it easier to remove the lid when you need to make changes. Since I have not yet rendered any kind of fasteners, I drew a rough sketch of what I meant:
When you want to remove the lid, you only have to unscrew the screw (circled in red) that goes through the lid. And when you want to reattach the lid, the screw is put back into place along with a nut (not shown) on the outside of the box, making it much easier to assemble.
Of course, before I make anything, I will first have to confirm the design with mentors (which I am doing today).


No comments:
Post a Comment